Common tests are over!!! Finally.... Woooohoooooo! Did not get really good results for HMT and Geo but at least I passed, phew... Anyways it has been a really busy and tiring week because of the tests and CCA. Talking about CCA, it was really tiring for the seniors as the SYF is coming. My senior was coaching me to play the snare and he was hitting the timing (with his sticks) while I play the snare when suddenly his sticks flew off. I was like O_O.... He said he was too tired. Lol anyways, I will get really busy this week because of the sports heat and cross country run (can't wait for it ^^), but still, the holidays are coming, any plans?
Anyways.... for Gundams... I got SD Lu Xun ZetaPlus, SD Zhang He Zaku III, HG Seraphim and a white Gundam marker last week.

Oh yeah!
I've completed all of them within a week ^^ and was really suprised that I could get Zhang He as it was just a few days after its release date in Japan. Fast shipping? But still, the kits are really nice, lets see SD Zhang He first.
I completed it when I got home after buying the kits.

Not muching colouring is needed but still, the yellowish 'gold' that Bandai provided is still a big problem. The helmet and weapons needed the gold, I dunno how much gold I have used up just for the helmet...

Love the awesomeness of its sword, I have to say it's one of my fav weapon design in the Sangokuden series.
By the way, the runners for Zhang He's body and helmet is actually from Si Ma Yi Sazabi! Parts of Si Ma Yi are left over and I coloured the helmet into Si Ma Yi's colour scheme just to try out the white marker I bought. The red turned out better than I expected.


Hehe, anyways, I dunno if I should buy the normal Si Ma Yi(500yen) or the Dataifu ver. of it(1050yen). Basically, the Dataifu ver. of it is just a re-colour of it( metallic red coating), the metallic red explains the price.
Okaes, for Lu Xun ZetaPlus... Design wise, it's really nice, its posibility is really good too. Quite alot of colouring needed.

Tada*
The clear blue pieces are really awesome.

Actually, it was said that the silver sticker was to be used to stick on the helmet which is behind the clear piece for the head, instead, I coloured it blue, that's why it have a darker blue.(If you've noticed)Sorry for the crappy quality of the picture from my phone.

Clear blue piece for the halberd. Pretty ^^
Some action poses...


It transforms too, maybe to represent more of the ZetaPlus.
That's it for Lu Xun.... now for Seraphim.
I took the risk to try out my Gundam marker on the clear pieces for the jewel on the head and hands of the Seraphim, it was my first try out. The clear pieces for the elbow is not a prob as I tried on the Arios before.

I coloured the red jewel on the V-Fin if not it will be just yellow and a little bit of red, in other words, not nice ^^


I'm very happy with the results of the green pieces ^^

My Gundam markers have really proved themselves this time!

Overall shot XD
The big V-Fins for the face burst mode are really loose and they even drop off when you pull them lightly... but still, I dare not bother with them too much, just in case it breaks. (They are really fragile)
The legs of the Seraphim are so thin and the feets are about 3 times smaller than the average gunplas that they can barely stand. It does not matter much if you pose it on a stand, but posing it standing up takes more skills than the other gunplas...
Some action poses...

The only weapons provided are the beam sabers.

"Damn you Innovators!"

As the backpack of the Seravee, the Seraphim is really smaller than many other gunplas.

Size comparison between Seraphim and my custom Slaughter Dagger. The Slaugther Dagger is already quite 'small' compared to other gunplas, but the Seraphim, is obviously shorter than it!
Talking about the custom Slaugther Dagger, I re-coloured it with my white and green Gundam marker. Basically. the normal colour scheme is drak grey, grey and maroon, but I changed it to white, green and grey.

=)
Other tan changing the colour scheme, I modded the rifle too. I tried to stuck a beam saber inside the scope, but it doesn't work, therefore, I had to trim away some parts of the beam saber holder and the scope. Then, I guled it together.

For the shield, I coloured the parts with dark grey white and left the grey grey. The next day, while I was using the computer, the shield dropped onto the floor and the parts fell apart.

But, I took the chance and coloured the grey parts green.

This is what I got. I tihnk that it is nicer than just leaving the grey parts grey.
Comparison between the customised one and the original one.

Overall shot ^^
Alrights.... That's it for this post, gotta go, byebye!
Anyways.... for Gundams... I got SD Lu Xun ZetaPlus, SD Zhang He Zaku III, HG Seraphim and a white Gundam marker last week.

Oh yeah!
I've completed all of them within a week ^^ and was really suprised that I could get Zhang He as it was just a few days after its release date in Japan. Fast shipping? But still, the kits are really nice, lets see SD Zhang He first.
I completed it when I got home after buying the kits.

Not muching colouring is needed but still, the yellowish 'gold' that Bandai provided is still a big problem. The helmet and weapons needed the gold, I dunno how much gold I have used up just for the helmet...

Love the awesomeness of its sword, I have to say it's one of my fav weapon design in the Sangokuden series.
By the way, the runners for Zhang He's body and helmet is actually from Si Ma Yi Sazabi! Parts of Si Ma Yi are left over and I coloured the helmet into Si Ma Yi's colour scheme just to try out the white marker I bought. The red turned out better than I expected.


Hehe, anyways, I dunno if I should buy the normal Si Ma Yi(500yen) or the Dataifu ver. of it(1050yen). Basically, the Dataifu ver. of it is just a re-colour of it( metallic red coating), the metallic red explains the price.
Okaes, for Lu Xun ZetaPlus... Design wise, it's really nice, its posibility is really good too. Quite alot of colouring needed.

Tada*
The clear blue pieces are really awesome.

Actually, it was said that the silver sticker was to be used to stick on the helmet which is behind the clear piece for the head, instead, I coloured it blue, that's why it have a darker blue.(If you've noticed)Sorry for the crappy quality of the picture from my phone.

Clear blue piece for the halberd. Pretty ^^
Some action poses...


It transforms too, maybe to represent more of the ZetaPlus.
That's it for Lu Xun.... now for Seraphim.
I took the risk to try out my Gundam marker on the clear pieces for the jewel on the head and hands of the Seraphim, it was my first try out. The clear pieces for the elbow is not a prob as I tried on the Arios before.

I coloured the red jewel on the V-Fin if not it will be just yellow and a little bit of red, in other words, not nice ^^


I'm very happy with the results of the green pieces ^^

My Gundam markers have really proved themselves this time!

Overall shot XD
The big V-Fins for the face burst mode are really loose and they even drop off when you pull them lightly... but still, I dare not bother with them too much, just in case it breaks. (They are really fragile)
The legs of the Seraphim are so thin and the feets are about 3 times smaller than the average gunplas that they can barely stand. It does not matter much if you pose it on a stand, but posing it standing up takes more skills than the other gunplas...
Some action poses...

The only weapons provided are the beam sabers.

"Damn you Innovators!"

As the backpack of the Seravee, the Seraphim is really smaller than many other gunplas.

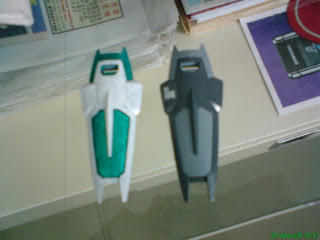
Size comparison between Seraphim and my custom Slaughter Dagger. The Slaugther Dagger is already quite 'small' compared to other gunplas, but the Seraphim, is obviously shorter than it!
Talking about the custom Slaugther Dagger, I re-coloured it with my white and green Gundam marker. Basically. the normal colour scheme is drak grey, grey and maroon, but I changed it to white, green and grey.

=)
Other tan changing the colour scheme, I modded the rifle too. I tried to stuck a beam saber inside the scope, but it doesn't work, therefore, I had to trim away some parts of the beam saber holder and the scope. Then, I guled it together.

For the shield, I coloured the parts with dark grey white and left the grey grey. The next day, while I was using the computer, the shield dropped onto the floor and the parts fell apart.

But, I took the chance and coloured the grey parts green.

This is what I got. I tihnk that it is nicer than just leaving the grey parts grey.

Comparison between the customised one and the original one.

Overall shot ^^
Alrights.... That's it for this post, gotta go, byebye!
posted by TurbyToddler at
9:09 PM
![]()


0 Comments:
Post a Comment
Subscribe to Post Comments [Atom]
<< Home